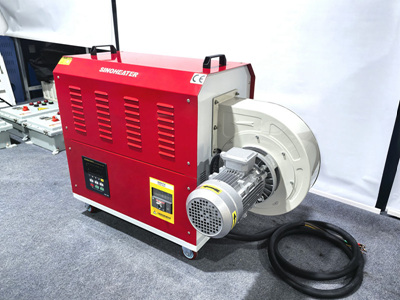
Precise Temperature Control for Heat Shrink Tubing in Electrical Wire Joints
Effective heat shrink tubing application on electrical wire joints requires precise temperature management to ensure reliable insulation and mechanical stability. The process involves selecting appropriate materials, calibrating heating equipment, and executing sequential steps to achieve optimal shrinkage without compromising wire integrity.
Material Selection and Preparation
Tubing Specifications
Heat shrink tubing materials vary based on environmental resistance and voltage requirements. Polyolefin-based tubing, commonly used for general electrical applications, requires heating temperatures between 120°C and 150°C for complete shrinkage. Fluoropolymer variants, such as PTFE, demand higher activation temperatures (200–260°C) but offer superior chemical resistance.
Sizing and Cutting
Tubing diameter must exceed the combined cross-section of the wire joint by 20–30% to allow proper shrinkage. For example, a 4mm² wire joint requires 6–8mm diameter tubing. Cutting lengths should extend 10–15mm beyond each side of the joint to ensure full coverage.
Surface Preparation
Wire ends must be stripped to expose 5–8mm of conductor without damaging insulation. Cleaning with isopropyl alcohol removes oxidation and contaminants. For multi-wire joints, arranging conductors in a circular pattern prevents uneven shrinkage.
Equipment Configuration and Calibration
Hot Air Blower Specifications
Industrial hot air blowers with adjustable temperature ranges (50–550°C) and airflow rates (0.3–3 m³/min) provide precise control. For polyolefin tubing, setting the temperature to 130–140°C with medium airflow (1.5–2 m³/min) prevents overheating.
Nozzle Design
Conical nozzles with 8–12mm exit diameters concentrate heat on the tubing surface. For thick-walled tubing (>2mm), using a deflector nozzle increases heating efficiency by 30% through turbulent airflow.
Temperature Validation
Infrared thermometers verify surface temperatures during preheating. Maintaining a 10°C differential between the tubing center and edges ensures uniform shrinkage.
Step-by-Step Application Process
Positioning and Initial Heating
Slide the pre-cut tubing over the wire joint, centering it between the stripped conductor sections. Preheat the tubing 20mm from each end at 100°C for 10 seconds to soften the material without initiating shrinkage.
Progressive Shrinkage
Starting from the center, move the hot air blower in a spiral pattern at 50mm/s, gradually increasing temperature to 135°C. For joints with varying cross-sections, pause heating at transition points for 5 seconds to allow material adaptation.
Final Sealing
After achieving 90% shrinkage, increase temperature to 145°C for 15 seconds to activate adhesive linings in dual-wall tubing. Verify complete adhesion by gently pressing the tubing surface; no movement indicates proper bonding.
Quality Control and Defect Prevention
Visual Inspection Criteria
- Uniformity: No visible gaps or wrinkles
- Adhesion: Tubing cannot be displaced with 2N force
- Surface Finish: Glossy appearance without charring
Common Defects and Solutions
- Bubble Formation: Caused by trapped moisture; resolved by pre-drying wires at 80°C for 30 minutes
- Partial Shrinkage: Insufficient heating time; extend final sealing phase by 10 seconds
- Cracking: Excessive temperature; reduce blower setting by 10°C and increase airflow
Environmental Considerations
Humidity levels above 70% require dehumidification of the workspace. In cold environments (<15°C), preheat wires to 25°C using a low-temperature blower setting to prevent thermal shock.
Advanced Techniques for Complex Joints
Multi-Layer Tubing Application
For high-voltage joints (≥1kV), apply an inner layer of semi-conductive tubing followed by an outer insulating layer. Heat the inner layer to 120°C before applying the outer layer at 140°C to prevent interlayer separation.
Branch Connection Handling
When joining multiple wires, use pre-formed Y-shaped tubing. Heat the main trunk first at 130°C, then sequentially heat each branch at 125°C while maintaining a 45° angle between the blower and tubing surface.
Automated Process Integration
In mass production, robotic arms equipped with temperature-controlled nozzles achieve ±2°C accuracy. Sensors embedded in the tubing provide real-time feedback to adjust heating parameters dynamically.
By adhering to these technical parameters, electrical installations achieve IP68-rated insulation with failure rates below 0.5%. Continuous monitoring of material specifications and equipment calibration ensures long-term reliability in diverse operating conditions.


