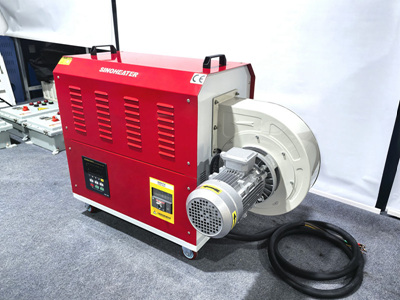
Troubleshooting and Repairing Heat Blower Issues Caused by Blocked Outlet Vents
A blocked outlet vent in a heat blower restricts airflow, leading to overheating, reduced efficiency, and potential component failure. Identifying and resolving blockages requires systematic inspection and cleaning. Below are detailed steps to diagnose and fix vent-related problems.
1. Recognizing Symptoms of Blocked Outlet Vents
Understanding the signs of restricted airflow helps pinpoint the issue quickly.
- Reduced Heat Output: If the heat blower produces weak or lukewarm air, the outlet vent may be partially or fully blocked. Insufficient airflow prevents the heating element from transferring heat effectively.
- Overheating and Shutdowns: The unit may shut off unexpectedly due to thermal protection activation. Overheating occurs when hot air cannot escape, causing internal temperatures to rise rapidly.
- Unusual Noises: Blocked vents can force the fan to work harder, leading to loud whirring, grinding, or rattling sounds. These noises often indicate airflow resistance.
2. Locating and Removing Physical Obstructions
Clear debris from the outlet vent and surrounding areas to restore airflow.
- Inspect the Outlet Vent: Turn off and unplug the heat blower. Visually examine the outlet vent for lint, dust, pet hair, or foreign objects (e.g., toys, paper). Use a flashlight to check deep within the vent if needed.
- Use a Vacuum or Brush: Attach a soft-bristle brush or crevice tool to a vacuum cleaner to gently dislodge debris from the vent. Avoid pushing debris further into the unit—work carefully to extract it.
- Clean the Vent Louvers: If the vent has adjustable louvers, ensure they’re not stuck or clogged. Use a damp cloth to wipe away dust buildup on the louvers and surrounding housing.
3. Checking for Internal Duct Blockages
Debris inside the heat blower’s ductwork can also impede airflow.
- Access the Ductwork: Remove the heat blower’s housing or filter covers to expose the internal ducts. Refer to the user manual for guidance on disassembly—some units require unscrewing panels or clips.
- Remove Obstructions: Use a long, flexible brush or compressed air to clear dust, lint, or debris from the ducts. Work gently to avoid damaging internal components or insulation.
- Inspect the Fan Blade: A dirty or obstructed fan blade reduces air circulation. Wipe the blade with a damp cloth to remove dust, and ensure it spins freely without hitting debris.
4. Addressing Filter-Related Blockages
Clogged filters restrict airflow and force the unit to overwork.
- Locate the Air Filter: Filters are typically found near the air intake or outlet vents. Some units have washable filters, while others require disposable replacements.
- Clean or Replace the Filter: For washable filters, rinse them under running water until the water runs clear. Allow them to dry completely before reinstalling. For disposable filters, replace them according to the manufacturer’s guidelines (usually every 1–3 months).
- Check Filter Housing: Ensure the filter fits snugly in its housing. Gaps around the filter allow unfiltered air to enter, reducing efficiency and increasing dust buildup.
5. Verifying Fan and Motor Functionality
A malfunctioning fan or motor exacerbates airflow issues caused by blockages.
- Test the Fan Operation: Plug in the heat blower and turn it on. Listen for the fan—if it doesn’t spin or runs slowly, the motor may be failing. Disconnect power and manually spin the fan blade—it should rotate freely.
- Lubricate the Motor: If the motor is noisy or runs hot, apply a few drops of lightweight machine oil to the bearings (following the manufacturer’s instructions). Avoid over-lubricating, as excess oil can attract dust.
- Check for Fan Damage: Inspect the fan blade for cracks, chips, or warping. Bent or broken blades reduce efficiency and can cause imbalance. Repair minor damage with adhesive or replace severely damaged blades.
6. Preventing Future Vent Blockages
Adopt maintenance habits to keep the heat blower running smoothly.
- Schedule Regular Cleanings: Clean the outlet vent, ducts, and filter monthly or as needed. Dust buildup accelerates in dusty environments, so clean more frequently if necessary.
- Position the Unit Properly: Avoid placing the heat blower near curtains, furniture, or walls that could block airflow. Maintain at least 12 inches of clearance around the outlet vent.
- Use a Protective Cover: When not in use, cover the heat blower with a breathable fabric cover to prevent dust from entering the vents. Avoid plastic covers, as they trap moisture and promote mold growth.
7. Troubleshooting Persistent Airflow Issues
If blockages persist despite cleaning, deeper problems may exist.
- Inspect the Heating Element: A dirty or damaged heating element can restrict airflow by causing uneven heat distribution. Visually check the element for dust buildup or cracks, and clean it gently with a soft brush if needed.
- Test the Thermal Sensor: A faulty sensor may misreport temperatures, causing the unit to overheat and shut down prematurely. Use a multimeter to test the sensor’s resistance and replace it if values are erratic.
- Consult a Professional: If airflow issues persist after troubleshooting, the unit may have internal damage (e.g., collapsed ducts, motor failure). A qualified technician can diagnose and repair complex problems.
By following these steps, users can resolve airflow issues caused by blocked outlet vents in their heat blowers. Prioritize safety—always unplug the unit before cleaning or disassembling components. Regular maintenance prevents blockages and extends the heat blower’s lifespan.


