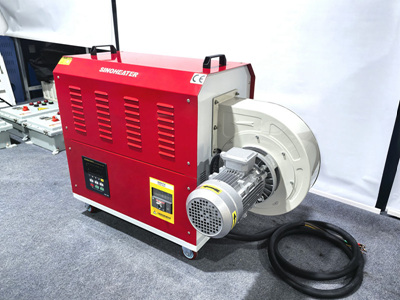
Precision Heating Techniques for Thermal Insulation Material Installation Using Hot Air Blowers
Effective thermal insulation installation in pipelines demands precise control over heating parameters to ensure material adhesion, structural integrity, and energy efficiency. Hot air blowers provide a non-contact solution for softening insulation materials, enabling seamless application on cylindrical surfaces. This guide explores temperature thresholds, airflow optimization, and material-specific techniques for achieving flawless insulation installation.
Temperature Control for Optimal Material Softening
Thermal insulation materials, such as polyethylene foam, glass wool, and rubber-based composites, exhibit distinct melting ranges and glass transition temperatures. Incorrect heating can lead to bubbling, delamination, or incomplete adhesion, compromising thermal performance.
Material-Specific Temperature Ranges:
- Polyethylene Foam: Softens at 80–100°C, ideal for low-temperature pipelines. Overheating beyond 120°C risks deformation.
- Glass Wool: Requires 150–180°C for activation, ensuring fiber flexibility without compromising structural integrity.
- Rubber-Based Composites: Demand 120–140°C for surface tackiness, enabling strong adhesive bonding.
Heating Zone Configuration:
- Preheating Zone: Apply 60–70°C to gradually raise material temperature, reducing thermal shock.
- Active Deformation Zone: Maintain target temperature (e.g., 160°C for glass wool) within ±5°C accuracy.
- Cooling Zone: Use ambient airflow to stabilize the insulation layer at 40–50°C, preventing post-installation shrinkage.
Defect Prevention:
- Localized Overheating: Deploy infrared sensors to monitor surface temperature and adjust hot air intensity dynamically.
- Uneven Softening: Rotate pipeline sections during heating to ensure uniform thermal penetration.
- Residual Stress: Implement a gradual cooling ramp (5–8°C per minute) to minimize cracking or warping.
Advanced Techniques:
- Dual-Zone Heating: Combine hot air with infrared lamps for surface heating without overheating interiors.
- Pulse Heating: Apply intermittent hot air bursts (3 seconds on, 2 seconds off) to control softening depth.
Airflow Management for Uniform Insulation Application
Hot air blower performance hinges on airflow velocity, nozzle design, and distance from the pipeline surface. Improper airflow can cause uneven softening or material displacement.
Nozzle Selection:
- Conical Nozzles: Direct heat in a 15–30° angle for focused applications on pipeline joints or bends.
- Slot Nozzles: Distribute heat evenly across long pipeline sections (e.g., 50m spans) with ±2°C accuracy.
- Deflector Nozzles: Create turbulent airflow to heat irregularly shaped pipelines uniformly.
Airflow Velocity and Distance:
- Low-Velocity (2–5 m/s): Ideal for thin insulation layers (≤10mm) to prevent surface distortion.
- Medium-Velocity (5–10 m/s): Suitable for medium-thickness layers (10–25mm) for balanced heating.
- High-Velocity (10–15 m/s): Required for thick insulation (25–50mm) to ensure deep thermal penetration.
- Optimal Distance: Maintain 5–15 cm between nozzle and pipeline surface to avoid excessive heat concentration.
Airflow Patterns:
- Linear Flow: Use for straight pipeline sections to ensure consistent heating.
- Swirling Flow: Ideal for complex geometries (e.g., elbows, tees) to eliminate dead zones.
- Oscillating Flow: Apply for large-area heating to reduce processing time by 20–30%.
Defect Prevention:
- Airflow Stagnation: Install fans to circulate exhaust air and maintain consistent heating.
- Surface Blowing: Adjust nozzle angle to prevent hot air from displacing softened insulation.
- Dust Contamination: Filter intake air to avoid particulate deposition on heated surfaces.
Process Optimization for Defect-Free Insulation Installation
Achieving flawless pipeline insulation requires adherence to sequential protocols and real-time adjustments.
Step-by-Step Installation Process:
- Surface Preparation: Clean pipeline surfaces with isopropyl alcohol to remove oils and contaminants.
- Initial Heating: Apply hot air at 70% intensity for 1–2 minutes to soften the insulation layer.
- Adhesion Application: Use spray adhesive or contact cement on both pipeline and insulation surfaces.
- Intermediate Heating: Reapply hot air for 30–60 seconds if adhesion resistance increases.
- Final Cooling: Allow parts to cool naturally in a controlled environment (20–25°C) for 5–10 minutes.
Material-Specific Adjustments:
- Amorphous Insulation (Polyethylene Foam): Heat faster (10–15°C per minute) due to lack of crystalline structure.
- Semi-Crystalline Insulation (Polypropylene Composites): Heat gradually (5–8°C per minute) to avoid sudden melting.
- Filled Insulation (Glass Wool with Binders): Increase heating time by 15–20% to compensate for reduced thermal conductivity.
Defect Prevention Strategies:
- Surface Blistering: Limit heating time to 80% of the theoretical softening duration.
- Edge Lifting: Pre-heat edges for an additional 30 seconds before full-layer application.
- Dimensional Shrinkage: Post-cool insulation under pressure (e.g., clamps) to maintain shape.
Advanced Techniques:
- Hot Air-Infrared Hybrid Heating: Combine hot air for bulk heating with infrared for surface finishing, reducing cycle time by 25%.
- Zone Control: Use multiple hot air blowers to create temperature gradients for multi-step installation.
- Feedback Systems: Integrate pyrometers and PLCs to adjust airflow and temperature in real time.
By integrating these techniques, installers can achieve precise pipeline insulation with minimal defects. Continuous monitoring of temperature, airflow, and material response ensures optimal results across diverse insulation types and pipeline configurations.


