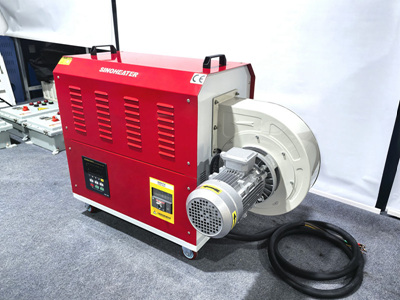
Troubleshooting Heat Blower Issues After Use in Dusty Environments
Prolonged exposure to dust and debris can clog airflow paths, damage components, and reduce efficiency in heat blowers. Identifying and addressing dust-related problems early prevents overheating and mechanical failures. Below are detailed steps to diagnose and fix common post-dust-exposure issues.
1. Recognizing Symptoms of Dust-Induced Damage
Understanding signs of dust accumulation helps prioritize repairs.
- Reduced Airflow or Weak Heat Output: If the heat blower produces less air or fails to reach desired temperatures, dust may be blocking vents, fans, or heating elements.
- Unusual Noises: Rattling, grinding, or whistling sounds often indicate dust-clogged fan blades, obstructed motors, or debris trapped in moving parts.
- Overheating or Frequent Shutdowns: Dust restricts airflow, causing components to overheat. The unit may shut down unexpectedly or display error codes related to thermal protection.
2. Initial Safety and Inspection Steps
Ensure safety and assess the extent of dust damage before repairs.
- Unplug and Disassemble: Immediately unplug the heat blower to avoid electric shock. Remove housing panels to access internal components, keeping screws or clips organized for reassembly.
- Inspect for Visible Dust Buildup: Look for thick layers of dust on the fan blades, motor, heating element, and air vents. Pay close attention to corners, crevices, and areas near the intake.
- Check for Blocked Filters: If the unit has air filters, inspect them for clogging. Dust-filled filters restrict airflow and force the motor to work harder, leading to overheating.
3. Cleaning Internal Components to Remove Dust
Thoroughly clean components to restore airflow and prevent further damage.
- Use Compressed Air or a Vacuum: Blow compressed air into vents, ducts, and fan areas to dislodge loose dust. Alternatively, use a vacuum with a brush attachment to gently suck up debris. Avoid high-pressure air, which can force dust deeper into components.
- Wipe Surfaces with a Damp Cloth: Gently wipe the motor housing, fan blades, and heating element with a slightly damp (not wet) cloth to remove stubborn dust. Ensure no moisture enters electrical parts.
- Clean or Replace Filters: If filters are washable, rinse them under running water and let them dry completely. If disposable, replace them with compatible filters.
4. Testing and Repairing Dust-Affected Components
Address mechanical or electrical issues caused by dust ingress.
- Inspect the Fan Motor: Dust can cause the motor to overheat or seize. Test the motor for smooth rotation—it should spin freely without resistance. If the motor is noisy or fails to turn, it may need lubrication or replacement.
- Check the Heating Element: Dust accumulation on the heating element can reduce efficiency or cause localized overheating. Use a soft brush to remove dust from the element’s surface. Test for continuity to ensure it’s functioning properly.
- Examine Wiring and Connectors: Dust can act as an insulator, increasing resistance and causing overheating. Check wiring for dust buildup, fraying, or loose connections. Clean terminals with a wire brush and apply dielectric grease to prevent corrosion.
5. Reassembling and Testing the Heat Blower
Rebuild the unit carefully and verify repairs.
- Reinstall Components: Securely reattach the fan, motor, heating element, and housing panels. Ensure all wiring is routed correctly and connections are tight.
- Power On the Unit: Plug in the heat blower and turn it on. Monitor for unusual noises, smells, or error codes. Run the unit on a low setting for 10–15 minutes to check for overheating.
- Test Airflow and Heat Output: Use a thermometer to measure the air temperature at the outlet. It should reach the expected range for the selected setting. Weak airflow may indicate lingering dust or a mechanical issue.
6. Preventing Future Dust-Related Damage
Adopt measures to protect the heat blower in dusty environments.
- Use in Cleaner Areas: Avoid operating the unit in construction zones, workshops, or other high-dust areas without proper ventilation. If unavoidable, use a dust cover when not in use.
- Schedule Regular Maintenance: Clean air vents, filters, and internal components monthly or more frequently in dusty conditions. Use compressed air or a vacuum to prevent buildup.
- Install a Pre-Filter (If Possible): Some heat blowers allow adding a pre-filter to trap larger particles before they reach internal components. Check the user manual for compatibility.
7. Troubleshooting Persistent Issues After Cleaning
If problems persist, deeper faults may require professional attention.
- Check for Hidden Dust Buildup: Dust may have settled in hard-to-reach areas (e.g., motor bearings, control boards). Disassemble further if needed to inspect and clean thoroughly.
- Test the Fan Blade Balance: Dust-clogged or imbalanced fan blades cause vibration and noise. Ensure the blade spins smoothly and is free of debris.
- Inspect the Control Board: Dust can short-circuit or corrode the circuit board. Look for burnt components, swollen capacitors, or dust-covered traces. Clean gently with compressed air or a soft brush.
8. Addressing Wear from Dust-Related Stress
Replace or reinforce components damaged by prolonged dust exposure.
- Lubricate Moving Parts: If the motor or fan bearings are stiff due to dust ingress, apply a few drops of lightweight machine oil to the bearing ports (following the manufacturer’s instructions). Avoid over-lubricating.
- Replace Worn Fan Blades: Dust-abraded fan blades may crack or become unbalanced. Replace them with compatible parts to prevent motor strain.
- Secure Loose Components: Vibration from dust-clogged fans can loosen screws or connections. Tighten all fasteners and reseat wiring to ensure stability.
By following these steps, users can repair heat blowers damaged by dust and restore proper function. Prioritize safety during disassembly and testing, and avoid using the unit until repairs are complete. Regular maintenance and protective measures minimize the risk of future dust-related issues.


